Back to the shopping....mom and I decided to hit up the fabric store, and things just took flight! I decided to buy enough fabric and ribbon to wrap 2 of my tables. Here is a picture of my room before. The table with the computers on it and the horseshoe table to the right will be covered.
**Please ignore the "summer clutter".
Here are the steps I took to prepare the fabric for the tables:
Step 1: You will need fabric (measured to fit around the side of the table), scissors, a glue gun, ribbon, and a ruler.
Step 2: Hot Glue the Ribbon to the bottom of the fabric, to make a border.
**My dog Jax decided he wanted to help!**
Step 3: Measure the distance from the top of the fabric that you will need to cut off, and glue down the top border ribbon. (I only did this for the first table, and skipped this step for the second table.)
Step 4: Fold the fabric over to make a hem, and hot glue the side down.
Step 5: Use velcro strips to attach the cloth to the side of the table.
Step 6: Cut slits in the fabric to allow chairs to slide under the table.
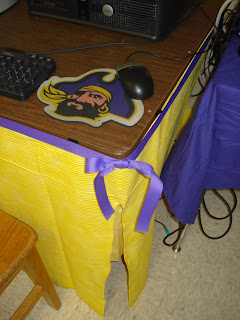
Notes: You may have noticed that the top border ribbon is missing from the "after" picture. Unfortunately, I mismeasured the cloth, and had to velcro the fabric below the ribbon.
For the second table, pictured below, I waited until the fabric was on the table before I attached the ribbon, and then only attached the ribbon to the top of the fabric, instead of the bottom so that you could see it better. I also added bows to the second table. And of course, I had to have one table themed for my alma mater:)
Arrrgghh!
My room is NOT NEARLY finished, but it sure has come a long way! What changes are you making to your classroom this year?


