Pages

Saturday, December 29, 2012

Trying to Get Ahead...


Hey bloggies!

With our school switching to common core this year, I think that **finally*  after about 1 1/2 weeks off of work, I have caught up.

Maybe.

Maybe Not.  


But, I feel ahead of the game because my math games for February are all made and ready!  (and my house is clean!!!)  I created a Valentine's Day Math Centers packet that is for sale on TPT for only $4!  Check it out!  The games review the topics of multiplication, multiplication and division fact families, rounding, and telling time.  Anyway, I hope that your break was wonderful and that you did NO work, like I wish I could have!

Valentine Math Centers

http://www.teacherspayteachers.com/Product/Valentine-Math-Centers


Sunday, December 23, 2012

3rd Grade gets Grinchy....without a camera!?!?

It's the most wonderful time of the year!!  And no, it is not summer break!  I actually enjoy Christmas break a LOT more than summer break, for quite a few reasons:

1.  I only need about 2 weeks to regenerate....2 months leads to boredom and unnecessary spending.
2.  Time with family
3.  My husband is off work for a few days
4.  Fun dresses for parties
5.  Pea Coats
6.  Presents:  hubby's birthday, our anniversary, and Christmas
7.  The crazy chance that there COULD MAYBE be a dusting of snow

Need I say more?  Christmas break is just my favorite!  


Over the past couple of weeks I have been doing a lot of super fun different Christmas activities from my classroom, and unfortunately, have not had a camera to capture every moment...blah.  That being said, here is the recap of Christmas in 3rd grade using pictures from the actual creators of the ideas!  Click the link below each picture to visit the website from where I got my idea!

Grinch Day!!

I decided this year to give "Grinch Day" a try, and it actually ended up being more of "Grinch Week".  I had to spread out the activities so that I could spend an adequate amount of time on each one!

Math-3rd grade is currently working on multi-step problem solving (I know you feel my pain here...), and it is so hard!! I chose to use a homemade powerpoint using Grinch themed questions and images to help motivate.  The kids thought it was a hoot!  

Reading-  We started out with a lesson on character traits, and I took this idea from Teaching in High Heels. First, you read aloud the book How the Grinch Stole Christmas, and then you work as a class to come up with character traits to describe the Grinch.  In the idea online, she used adjectives:

Grinch adjectives
http://teachinginhighheels.blogspot.com/
The next day, we had a mini-lesson on similes and metaphors from the song "You're a mean one, Mr. Grinch".  LOVED this activity!!  That song is full of metaphors, with a few similes too!  The students had a paper copy with the lyrics from the song, and had to highlight the similes and metaphors in two different colors of highlighters.  Then, each kids wrote an acrostic poem using the letters GRINCH, and writing similes to make up the poem.  They had a great time with this, too!  We also made paper grinches to go along with the poem.  In case you need a refresher:


On the last day of school, we had Grinch punch, which is just sprite, vanilla ice cream, food coloring, and some green sprinkles, and also we made Christmas trees from Whoville, which were sugar cones, white icing, made green with food coloring, and small candies for the ornaments.  We enjoyed all of this while watching the cartoon version of the movie.

idea from:  Kids Creative Chaos


Grinch Punch Recipe
idea from:  Taste of Home
We also spent some time doing holiday writing, using apple cinnamon ornaments and The Polar Express by Chris Van Allsburg as inspiration.  The kids always enjoy these activities.  To visit my post about apple cinnamon ornaments, click HERE. To see my polar express writing unit on TPT, click HERE.


HO HO HO!  Merry Christmas!  I hope you all enjoy the Holidays as much as I will!

Wednesday, September 12, 2012

Man on the Moon Timeline

Hello blog world!

It's been a hot second since I posted last.  I know you all feel the pain.  It seems like no matter how prepared you THINK you are during the summer, there is a massive amount of catching up to be done as soon as school starts back.  But, the good news is that I have a fantabulous group of kids this year, and it has been nothing but fun to head into work every day.

This week, our focus reading skill is sequencing, and today we were doing some sequencing with nonfiction work.  Integration is being pushed big time at school, so we first visited a website to learn about Neil Armstrong and the first space visit.  After that, we made one large timeline as a class.  I was pleasantly surprised at how well my kids delegated tasks!  Here are a few pictures from the lesson:


Each group was assigned a specific date from the events involving the first lunar landing.


Then they delegated tasks:  who would write the sentence, who would draw what part of the picture, who would add the color, etc.


They were so sweet to each other during the work, and were definitely constructive in their suggestions!

We also FINALLY finished up our book boxes today.  They are still in need of some modge podging by yours truly, but the kids have glued down their magazine clippings.  
**Future advice I wish I had known:  Give the kids at least an hour.  30 minutes is really just not enough time:)


That's all for now!  


Saturday, August 11, 2012

Reading and Writing Posters

It's almost here!  Back to school time!!  In preparation, I have been using pinterest for my own personal professional development:)  Sometimes I think maybe looking at pictures of other people's classrooms and ideas can be just as useful as actual professional development! Just maybe;)

Anyway, I was inspired after seeing a couple of classroom posters:  one for reading book nooks, and one for writing rubrics.  I am sticking with my "free is for me" theory in preparation for the school year, so I didn't buy any new posterboard, even though colored posters would definitely be cuter:)

Book Nooks-Students will know where they need to be during reader's workshop.  I will use clothespins with student names on them to show which student belongs at which spot.

This is a writing rubric to leave up in the room to help students know what is expected of them during writer's workshop.
Now, let me say that these are COMPLETELY copied from pinterest.  I mean, right down to the stories that are on the writing rubric.  But, I made my own version, so I figured I would share it with my followers anyway.    Here are a few more pictures, up close.  I hope these pictures inspire you for ways to manage your classroom this fall!


Have you taken on any pinterest projects for this upcoming school year?

Thursday, August 9, 2012

Reader's and Writer's Notebooks

Hello and Welcome to AUGUST!!

Can you believe it is already August!?  Where did the last 2 months go!?  I don't know about all of you, but while I love summertime, I am secretly excited about getting back into the swing of things.  Shhh....don't tell.

Anyway, in preparation for next year, I spent some time making sample Reader's and Writer's notebooks for my kids to see before the make their own this year.   And, for your viewing pleasure, I have included a step by step guide for you!  **Also, in keeping with my "save money" theory that I am trying to stick with this year, all of the materials that I used were scrounged up in my classroom and at home. 

Step 1:  Start out with a marble notebook, construction paper, scissors, marker, glue, and tape.  I ask my kids to bring in marble notebooks, but a notebook with rings would be fine too:)

Step 2:  Decide how you would like your students to divide their notebooks.  I decided for my reading notebook, that I would have 4 sections:  Notes (10 pages), Class Work (30 pages), My Reading (30 pages), and Guided Reading (30 pages).  You should know this in advance so that you do not allot too many pages to any one section. 

Cut the construction paper to fit the size of the pages in the notebook.  Fold that page to make 2 triangles.  They will not "line up".


Step 3:  Cut the paper into 2 triangles.  You will need to do this for as many dividers as you want to have.  I have 4 triangles, which took two sheets of construction paper.


Step 4:  Label the construction paper with the headings that you would like them to have.  I used red marker to match the red front of my notebook, and I chose to have all of the dividers look the same, to make the notebook more cohesive.


Step 5:  Glue the pages down only around the two edges that are on the sides of the notebook.  (This will be the two sides which make a right triange.)  I also used tape to reinforce.  The construction paper should make a pocket on the page.

You can see the tape on the side of the page.  This will help ensure the construction paper does not fall out or peel up.
This is how the paper will serve as a pocket.
Step 6:  Repeat the steps for the remainder of the pages in the notebook.  Use the extra construction paper to create a title for the front of the notebook.  I chose for my title to match the rest of the dividers in the notebook.


**For my writing notebook, I followed the same process.  I chose to have 3 sections in the writing notebook:  Notes (10 pages), Writing (All pages in the middle of the notebook), and Words (the last 4 pages).  I used a word wall template on the last four pages for students to record new vocabulary and tricky words to use as a reference when they are writing.  There are pictures of the Writer's Notebook below.

Writer's Notebook

dividers

Individual Word Wall for each notebook
Finished Products!
Best of Luck on getting everything ready for the year! 


Monday, July 30, 2012

Classroom Table Makeover

Last week, while out shopping with my mom, I started thinking about ways that I could freshen up my classroom.  Let me give you a little background about this room.  It is part of a VERY old building.  Like, built in the 1960's old.  So, while I am SO thankful for all of the space that I have, most of the stuff in the room is outdated and oldddddd. 

Back to the shopping....mom and I decided to hit up the fabric store, and things just took flight!  I decided to buy enough fabric and ribbon to wrap 2 of my tables.  Here is a picture of my room before.  The table with the computers on it and the horseshoe table to the right will be covered.
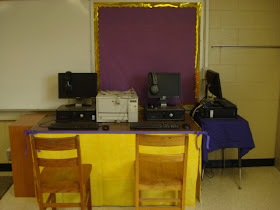
**Please ignore the "summer clutter".


Here are the steps I took to prepare the fabric for the tables:

Step 1:  You will need fabric (measured to fit around the side of the table), scissors, a glue gun, ribbon, and a ruler.


Step 2:  Hot Glue the Ribbon to the bottom of the fabric, to make a border.


**My dog Jax decided he wanted to help!**

Step 3:  Measure the distance from the top of the fabric that you will need to cut off, and glue down the top border ribbon.  (I only did this for the first table, and skipped this step for the second table.)


Step 4:  Fold the fabric over to make a hem, and hot glue the side down.


Step 5:  Use velcro strips to attach the cloth to the side of the table.


Step 6:  Cut slits in the fabric to allow chairs to slide under the table.


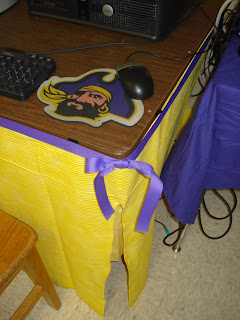
Notes:  You may have noticed that the top border ribbon is missing from the "after" picture.  Unfortunately, I mismeasured the cloth, and had to velcro the fabric below the ribbon. 

For the second table, pictured below, I waited until the fabric was on the table before I attached the ribbon, and then only attached the ribbon to the top of the fabric, instead of the bottom so that you could see it better.  I also added bows to the second table.  And of course, I had to have one table themed for my alma mater:)


Arrrgghh!


My room is NOT NEARLY finished, but it sure has come a long way!  What changes are you making to your classroom this year?

Friday, July 27, 2012

Fireflies Literacy Unit

Happy Friday Everyone!

**I direct that especially to my year-round friends, since technically, every day is a Friday for me right now:)  I just finished up making a new literacy unit to use in conjunction with the book Fireflies by Julie Brinckloe.  I just LOVE using this book to teach writing, because the vocabulary in the book is amazing! 

Click HERE or click the picture of the unit below to check it out in my TPT store!

Click HERE to view the book on barnesandnoble.com:

Fireflies! (Turtleback School & Library Binding Edition)


I have also recently finished up a clock label display to use in my classroom next year!  Check it out by clicking HERE, or click the picture below:


I chose purple and gold as a salute to my alma mater, East Carolina University.  ARRRGGHH!!  Football season is just around the corner!!

What are you looking forward to this fall??

Thursday, July 26, 2012

Reader's Notebook Book Box Project

Good Morning Bloggies!

This year, I have decided that I want to get more organized with my reader's notebooks that my kids are using.  In the past, they have kept their notebooks in their desks, but I am sure you all know that notebooks get torn up and lost so easily that way.  I have been perusing the web, and have seen lots of magazine boxes and plastic bins being used to hold the reader's notebooks, and that is the route I decided to take.

Problem.

I cannot afford to buy 25 plastic bins for my kids.  Now I know there are cheap options, and I also know that a dollar goes a long way at the dollar tree.  But, I just wanted to make this happen for FREE. 

like, totally free

Cue Homemade Reader's Notebook Book Box Project!  I have been saving up cereal boxes, and the kids are I are going to personalize our own book boxes next year.  Last night, I created my own "sample" book box to show the kids (and you) how to make them!

Step 1:  Scrounge up magazines, pictures, a cereal box, modge podge and a paint brush, construction paper, scissors, glue sticks, and markers.  I used washable markers, and ended up wishing I had gone with Sharpies or other permanent versions.


Step 2:  Cut down your cereal box to the shape of a magazine holder.

Step 3:  Cut out pictures from magazines and select personal photos to glue to the box.


Step 4:  Use glue sticks to stick all of the pictures on the box, and trim the pictures so that they are not sticking off the sides of the box.


Step 5:  Make cutesy word labels to describes the reason for choosing the pictures you chose.  Ex:  I wrote "run" and stuck it by the running pictures because I enjoy running.  You could certainly tie an inference lesson into this part of the craft.  Students could ask others use their box to infer their interests!


Step 6:  Glue the words onto your box using the glue sticks.


Step 6:  Modge Podge the box using a small paintbrush or sponge brush. 

**Note:  I used washable markers, and my words bled when I modge podged them.  In retrospect, I would either use sharpies or NOT modge podge over the paper pieces that I drew on.


All Done!!  Your dried finished product will be ready to hold books and notebooks, and is a much more personalized version of the book box than a plastic bin!


Catch ya later!  I have a lot of cereal to eat!