Can you believe it is already August!? Where did the last 2 months go!? I don't know about all of you, but while I love summertime, I am secretly excited about getting back into the swing of things. Shhh....don't tell.
Anyway, in preparation for next year, I spent some time making sample Reader's and Writer's notebooks for my kids to see before the make their own this year. And, for your viewing pleasure, I have included a step by step guide for you! **Also, in keeping with my "save money" theory that I am trying to stick with this year, all of the materials that I used were scrounged up in my classroom and at home.
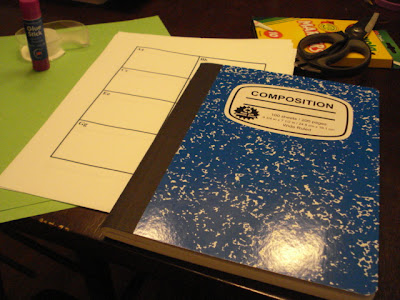
Step 1: Start out with a marble notebook, construction paper, scissors, marker, glue, and tape. I ask my kids to bring in marble notebooks, but a notebook with rings would be fine too:)
Step 2: Decide how you would like your students to divide their notebooks. I decided for my reading notebook, that I would have 4 sections: Notes (10 pages), Class Work (30 pages), My Reading (30 pages), and Guided Reading (30 pages). You should know this in advance so that you do not allot too many pages to any one section.
Cut the construction paper to fit the size of the pages in the notebook. Fold that page to make 2 triangles. They will not "line up".
Step 3: Cut the paper into 2 triangles. You will need to do this for as many dividers as you want to have. I have 4 triangles, which took two sheets of construction paper.
Step 4: Label the construction paper with the headings that you would like them to have. I used red marker to match the red front of my notebook, and I chose to have all of the dividers look the same, to make the notebook more cohesive.
Step 5: Glue the pages down only around the two edges that are on the sides of the notebook. (This will be the two sides which make a right triange.) I also used tape to reinforce. The construction paper should make a pocket on the page.
 |
| You can see the tape on the side of the page. This will help ensure the construction paper does not fall out or peel up. |
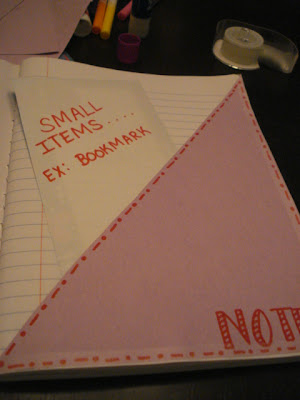 |
| This is how the paper will serve as a pocket. |
Step 6: Repeat the steps for the remainder of the pages in the notebook. Use the extra construction paper to create a title for the front of the notebook. I chose for my title to match the rest of the dividers in the notebook.
**For my writing notebook, I followed the same process. I chose to have 3 sections in the writing notebook: Notes (10 pages), Writing (All pages in the middle of the notebook), and Words (the last 4 pages). I used a word wall template on the last four pages for students to record new vocabulary and tricky words to use as a reference when they are writing. There are pictures of the Writer's Notebook below.
 |
| Writer's Notebook |
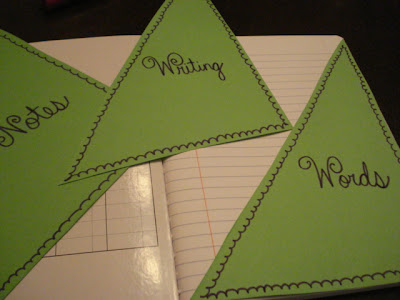 |
| dividers |
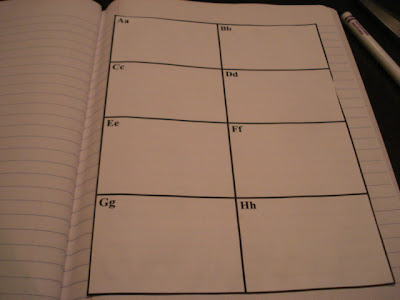 |
| Individual Word Wall for each notebook |
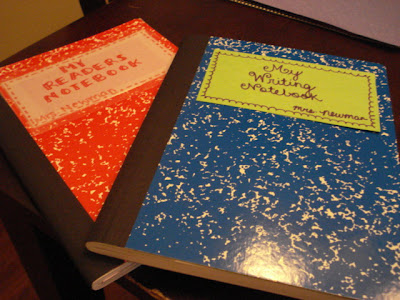 |
| Finished Products! |
Best of Luck on getting everything ready for the year!


I love this! I am doing this with my kids. Thanks for sharing.
ReplyDelete✰Becca
Simply 2nd Resources
Thank you!
DeleteWhat goes in each section of the reading notebook? I think it looks like a wonderful idea but am unclear as to what the students are documenting. Thanks!
ReplyDeleteYou could document in whatever way you needed to! For me, it changed throughout the year, based on what the kids needed. In retrospect, I would only have three sections in the reading notebook, and take out the "my reading" section. We ended up using that section for guided reading. In the notes section, we kept notes and printables about new information that we were learning. In the classwork section, if we made thinking maps or other graphic organizers, the kids would record them here. For the guided reading section (my most used section), the kids would practice written response during guided reading. This was a great documentation for how the kids writing progressed as the year went on. In the writers notebook, we used the notes section for notes or printables with new information on it, the writing section for writing rough drafts, and the words section for kids to write new words that they learned throughout the year, or words that they had trouble with. The words section served as their own personal word wall. You can use any of the sections in any way though! Hope this helps!
DeleteAwesome organization of reading and writing notebooks. :-)
ReplyDeleteI'm curious to know what you have your kids put in the reading and guided reading sections. I'm restructuring my kids' notebooks a tad this year. Your feedback would be much appreciated! Thanks!
ReplyDeleteYou could document in whatever way you needed to! For me, it changed throughout the year, based on what the kids needed. In retrospect, I would only have three sections in the reading notebook, and take out the "my reading" section. We ended up using that section for guided reading. In the notes section, we kept notes and printables about new information that we were learning. In the classwork section, if we made thinking maps or other graphic organizers, the kids would record them here. For the guided reading section (my most used section), the kids would practice written response during guided reading. This was a great documentation for how the kids writing progressed as the year went on. In the writers notebook, we used the notes section for notes or printables with new information on it, the writing section for writing rough drafts, and the words section for kids to write new words that they learned throughout the year, or words that they had trouble with. The words section served as their own personal word wall. You can use any of the sections in any way though! Hope this helps!
DeleteI have been a teacher for 22 years, all in 4th and 5th grade. I am changing schools this fall and teaching THIRD grade (yes, for the first time!) I love your comp books and the dividers. I am looking forward to getting more great ideas for my new adventure with the younger kiddos! Thank you!
ReplyDeleteYou are going to love it!! Third graders are awesome, and very needy when they come to you! Best of luck!
ReplyDeleteLove your pocket! I just blogged about adding that to my interactive science notebooks and linked back to your post with the original idea!
ReplyDeletehttp://www.mathiselementary.blogspot.com/2013/07/interactive-science-notebooks-part-8.html
Julie
Math is Elementary
Great! I am so glad that you liked it! Best of luck with your science notebooks this year!
ReplyDeleteWhat a cute Idea! I am most definitely going to use this.. Thanks for sharing.. From another Neumann :)
ReplyDeleteYou are my notebooking hero. We are just starting a Reading Response Notebook this year (2nd grade), and I'm so excited for some of your shared resources! :)
ReplyDelete-Gayla
Teach On.
Love it!! I would probably add a few pages at the beginning for a table of contents, or a page at the beginning of each section and label page numbers. I find that especially with writer's notebooks, it is nice to be able to look up certain passages and quickly get to it. Thank you so much for the great idea!
ReplyDeleteThis comment has been removed by a blog administrator.
ReplyDeleteThis comment has been removed by a blog administrator.
ReplyDeleteThis comment has been removed by a blog administrator.
ReplyDeleteThis comment has been removed by a blog administrator.
ReplyDeleteThis comment has been removed by a blog administrator.
ReplyDeleteThis comment has been removed by a blog administrator.
ReplyDelete