template

Showing posts with label Reading. Show all posts

Saturday, August 11, 2012

Reading and Writing Posters

It's almost here!  Back to school time!!  In preparation, I have been using pinterest for my own personal professional development:)  Sometimes I think maybe looking at pictures of other people's classrooms and ideas can be just as useful as actual professional development! Just maybe;)

Anyway, I was inspired after seeing a couple of classroom posters:  one for reading book nooks, and one for writing rubrics.  I am sticking with my "free is for me" theory in preparation for the school year, so I didn't buy any new posterboard, even though colored posters would definitely be cuter:)

Book Nooks-Students will know where they need to be during reader's workshop.  I will use clothespins with student names on them to show which student belongs at which spot.

This is a writing rubric to leave up in the room to help students know what is expected of them during writer's workshop.
Now, let me say that these are COMPLETELY copied from pinterest.  I mean, right down to the stories that are on the writing rubric.  But, I made my own version, so I figured I would share it with my followers anyway.    Here are a few more pictures, up close.  I hope these pictures inspire you for ways to manage your classroom this fall!


Have you taken on any pinterest projects for this upcoming school year?

Thursday, August 9, 2012

Reader's and Writer's Notebooks

Hello and Welcome to AUGUST!!

Can you believe it is already August!?  Where did the last 2 months go!?  I don't know about all of you, but while I love summertime, I am secretly excited about getting back into the swing of things.  Shhh....don't tell.

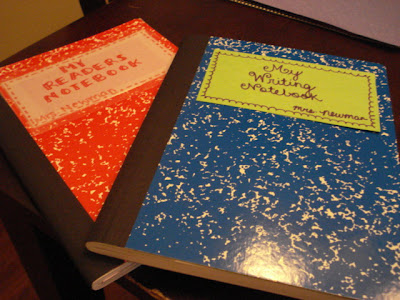
Anyway, in preparation for next year, I spent some time making sample Reader's and Writer's notebooks for my kids to see before the make their own this year.   And, for your viewing pleasure, I have included a step by step guide for you!  **Also, in keeping with my "save money" theory that I am trying to stick with this year, all of the materials that I used were scrounged up in my classroom and at home. 

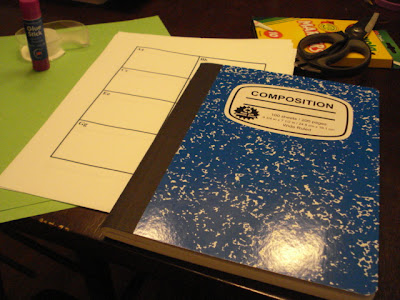
Step 1:  Start out with a marble notebook, construction paper, scissors, marker, glue, and tape.  I ask my kids to bring in marble notebooks, but a notebook with rings would be fine too:)

Step 2:  Decide how you would like your students to divide their notebooks.  I decided for my reading notebook, that I would have 4 sections:  Notes (10 pages), Class Work (30 pages), My Reading (30 pages), and Guided Reading (30 pages).  You should know this in advance so that you do not allot too many pages to any one section. 

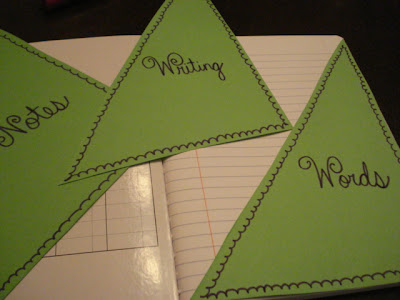
Cut the construction paper to fit the size of the pages in the notebook.  Fold that page to make 2 triangles.  They will not "line up".


Step 3:  Cut the paper into 2 triangles.  You will need to do this for as many dividers as you want to have.  I have 4 triangles, which took two sheets of construction paper.


Step 4:  Label the construction paper with the headings that you would like them to have.  I used red marker to match the red front of my notebook, and I chose to have all of the dividers look the same, to make the notebook more cohesive.


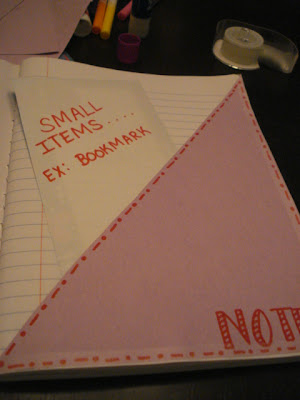
Step 5:  Glue the pages down only around the two edges that are on the sides of the notebook.  (This will be the two sides which make a right triange.)  I also used tape to reinforce.  The construction paper should make a pocket on the page.
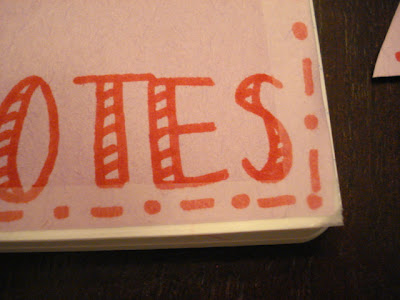
You can see the tape on the side of the page.  This will help ensure the construction paper does not fall out or peel up.
This is how the paper will serve as a pocket.
Step 6:  Repeat the steps for the remainder of the pages in the notebook.  Use the extra construction paper to create a title for the front of the notebook.  I chose for my title to match the rest of the dividers in the notebook.


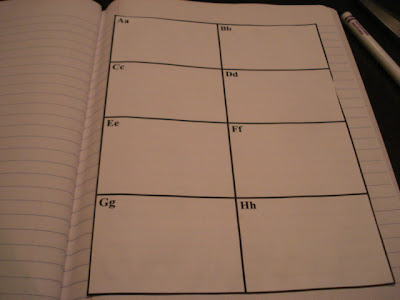
**For my writing notebook, I followed the same process.  I chose to have 3 sections in the writing notebook:  Notes (10 pages), Writing (All pages in the middle of the notebook), and Words (the last 4 pages).  I used a word wall template on the last four pages for students to record new vocabulary and tricky words to use as a reference when they are writing.  There are pictures of the Writer's Notebook below.
Writer's Notebook

dividers

Individual Word Wall for each notebook
Finished Products!
Best of Luck on getting everything ready for the year! 


Thursday, July 26, 2012

Reader's Notebook Book Box Project

Good Morning Bloggies!

This year, I have decided that I want to get more organized with my reader's notebooks that my kids are using.  In the past, they have kept their notebooks in their desks, but I am sure you all know that notebooks get torn up and lost so easily that way.  I have been perusing the web, and have seen lots of magazine boxes and plastic bins being used to hold the reader's notebooks, and that is the route I decided to take.

Problem.

I cannot afford to buy 25 plastic bins for my kids.  Now I know there are cheap options, and I also know that a dollar goes a long way at the dollar tree.  But, I just wanted to make this happen for FREE. 

like, totally free

Cue Homemade Reader's Notebook Book Box Project!  I have been saving up cereal boxes, and the kids are I are going to personalize our own book boxes next year.  Last night, I created my own "sample" book box to show the kids (and you) how to make them!

Step 1:  Scrounge up magazines, pictures, a cereal box, modge podge and a paint brush, construction paper, scissors, glue sticks, and markers.  I used washable markers, and ended up wishing I had gone with Sharpies or other permanent versions.


Step 2:  Cut down your cereal box to the shape of a magazine holder.

Step 3:  Cut out pictures from magazines and select personal photos to glue to the box.


Step 4:  Use glue sticks to stick all of the pictures on the box, and trim the pictures so that they are not sticking off the sides of the box.


Step 5:  Make cutesy word labels to describes the reason for choosing the pictures you chose.  Ex:  I wrote "run" and stuck it by the running pictures because I enjoy running.  You could certainly tie an inference lesson into this part of the craft.  Students could ask others use their box to infer their interests!


Step 6:  Glue the words onto your box using the glue sticks.


Step 6:  Modge Podge the box using a small paintbrush or sponge brush. 

**Note:  I used washable markers, and my words bled when I modge podged them.  In retrospect, I would either use sharpies or NOT modge podge over the paper pieces that I drew on.


All Done!!  Your dried finished product will be ready to hold books and notebooks, and is a much more personalized version of the book box than a plastic bin!


Catch ya later!  I have a lot of cereal to eat!


Monday, September 12, 2011

Thank you Donors Choose!!

Thanks to Donors Choose, our class has received a brand new set of listening center books!!  Hooray!!  I am so excited about this, and so are my kids!!  If you don't know about Donor's Choose, please go check out their website.  It is a fabulous resource for teachers, and has helped me so much in my classroom already!  Here are some pictures of my kids with their new books:

Some of the kids with one of the new book sets:)


All of the students are holding one of the 8 new book sets from our Donors!

And again.....just can't get enough of these sweet faces!!

We wrote friendly letters to thank our generous donators!
Also, right now, Sonic is holding it's annual Limeades for Learning competition.  I am sure most of you already know, but in case you didn't.....Sonic will fund the projects that receive the most votes on the Limeades for Learning website.  Please take a second to check it out and vote!  My project is aimed at getting a NOOK color for my classroom:)  Here is the link to my project:

Mrs. Newman's "Bringing Words to Life with a NOOK Color" Project

If that link doesn't take you there, type in "Bringing Words to Life with a NOOK Color", and my project will appear.  It is TOTALLY FREE to vote!!  And hey, even if you aren't hyped about my project, vote for someone's!!  It is a great cause and all votes are appreciated!!

Happy Monday All!

Tuesday, August 2, 2011

I'm having a SALE!!


I CANNOT BELIEVE IT IS AUGUST.  ALREADY.  I mean, I really feel like I am just getting into the whole swing of summer.  I have finally acclimated myself to RELAX, and now it is time to wind back up!!  So, in the spirit of Back to School time, I have having a 15% sale off everything on my Teachers Pay Teachers page....now, there are only currently 3 items there, but, those safari centers are the bomb dot com, and now they are less than $4!!  Practically a steal!!  The sale runs today through Friday, so go check it out and pick up some goodies!!

Click here to go to the Teachers Pay Teachers Back to School Sale!!


Other great places for sales:

The LOFT-I literally tried on a pair of pants for $2.88 yesterday!
Old Navy
New York and Company
Victoria's Secret


Catch you later!!!

Monday, August 1, 2011

Spellin' like a felon!

Ok, so after battling-literally battling-with Google Docs, I have it uploaded.  Finally, after weeks of work, I have finished my spelling plan for the 2011-2012 school year.  It may seem like no big deal to some, but as a second year teacher, I struggled with spelling instruction-fitting it in my schedule, teaching explicitly and in a focused way, etc.....Let's just say...it is so stinkin' hard to fit spelling in!

That being said, I decided to come up with a very direct way to teach spelling.  I took ideas from various sources, mostly using the ideas from Beth Newingham.  She is wonderful!  Here's what I came up with:

Monday:  30 minutes of spelling instruction based on the spelling rule for the week.

Tuesday-Thursday:  30 minutes of spelling practice based on the spelling rule of the week. The activities on these days can vary depending on the needs of the group.

Friday:  20 minutes of spelling assessment.  This will include the spelling tests for the current week and spelling pretests for the following week. Pretests are given, and if students make a 90% or better on the pretest, they will receive a challenge list for the next week.

The google doc that I have attached is a list of all of the spelling lists needed for the ENTIRE YEAR!!  That is all of pre/posttests, the regular study words, and the challenge words!  I am extremely excited about finishing this list, and I hope you enjoy it and use it in your classrooms!   I consider this to be an extremely useful FREEBIE!!

Spelling Instruction 2011-2012

And below is the much cuter version I published on Scribd!!

Word Work 2011-2012

Sunday, July 24, 2011

Safari Themed Literacy Centers!

Well, it has been a work in progress, but I have finished my safari themed word work centers!  I have been diligently working to make centers that I would be ready to use next year with my 3rd graders, and I am super excited with how they have turned out! Please visit my page on TpT and let me know what you think!

Safari Word Work Centers

The thumbnail generator wasn't working, but hopefully those will be coming soon!

Preview of the super cute graphics that I got from Lettering Delights......

Wednesday, July 20, 2011

Arrrgh!!! Summer Reading Camp.....Pirate Style!

For the past two weeks, I have been lucky enough to be a part of my school's summer reading camp.  It is a 2 week intensive reading intervention camp for our rising 2nd and 3rd graders.  I totally viewed this camp as my chance to THEME OUT!  I usually don't have a classroom theme, because I like a combination to too many things, but with a camp setting like this, it was the perfect time to try out a theme.  And, being that we are living in the home of the PIRATES....what better theme could there be!!  I mean, at one time I even WAS a pirate!!  I bleed purple and gold!! (see below)

Arrrgh!  Me and Mike (now referred to as hubs) cheering on our Pirates!
Anyway, that's another story for another day, and all of these things lead to our decision to go with the pirate theme.  We collaborated ideas, collected read alouds, smartboard lessons, and printables from Anna Brantley on TpT.  LOVE the CENTERS!!  These centers were pirate themed and perfect for our struggling readers!

Here are a few snapshots of the things that we were doing during camp!  Enjoy!

Our reading rotation chart for center time

Up close:)  Each group had a "pirate name".  So for this rotation, the landlubbers were at the reading center.

Here is our work journal, where we recorded our morning journal entries and all of our reading work.  Also, there is a bookmark on the desk that I downloaded from this website.  The pirate on the corner was used as a name plate!

Close up of the name plate!


My Crew!!
Predictions in our Reading Journal (for Pip the Penguin)


Anna Brantley's Read the Room Center...Love!


Read the room cards from Anna Brantley!

Arrrgh!  Room Decoration aka Yard Flag:)

Anna Brantley's Pirate Literacy Centers-laminated and organized for storage!

Pirate read alouds used for teaching reading skills

Work Samples from our Good Work board in the hallway


This is our class work board that I hung in the hall.  Each camper had work on the board, and a gold coin with their name on it to identify whose was whose.


My co-teacher's board hanging across the hall!


Eager campers!!


A circle map of the new reading words that we learned about during camp!  I am so proud of them!!
 So, overall I would say that reading camp was a huge success!  The kids had fun, and I enjoyed getting to use a theme!  Happy Camping!